|
|
|

|
|
|
Physics, Design and Social Justice Guidelines
You have been tasked with the following challenge:
Design and construct physics-based, marketable solution to a local social justice issue in the area of transport, energy or housing.
These social justice topics are related to the following physics concepts.
The Engineering Design Process
You have been tasked with the following challenge:
Design and construct physics-based, marketable solution to a local social justice issue in the area of transport, energy or housing.
These social justice topics are related to the following physics concepts.
- Transport: Kinematics
- Housing: Forces + Newton's Laws
- Energy: Conservation of Energy
The Engineering Design Process
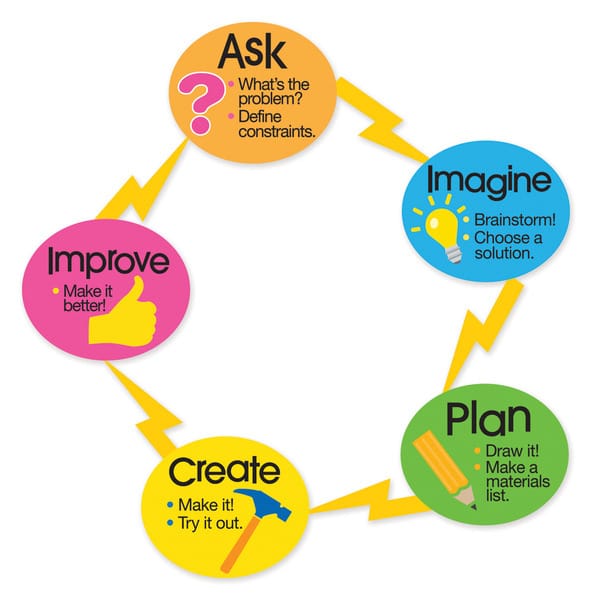
Step 1: Ask
As you identify your growth opportunity, it is important to consider whether design thinking is a fit for solving it. Design thinking is an approach to solving problems especially suited to conditions of high uncertainty. Your project should focus on a design thinking solution.
Write down an area of opportunity you think you might like to explore. Research local issues related to your topic. Ask friends, families and experts in the field about problems that need solving.
Create a professional Twitter account with your school email. Find appropriate organizations, knowledgeable people and advocates to follow as a source of current information.
Information about documenting your project will be provided to you as well as how you will justify your use of physics to solve the problem.
Step 2: Imagine A Solution
This is where you develop possible solutions by brainstorming ideas. You’ll work with your team to develop as many solutions as possible. This is the time to encourage wild ideas and defer judgment. Build on the ideas of others. Stay focused on topic and have one conversation at a time. Remember, good design is all about teamwork.
You may wish to use post-it notes as a means to document all of your ideas. Be sure to take photos of your post-it notes.
Due Date: Friday, November 18
Feedback Alert: Your peers will give you feedback on your design.
Remember: “If someone likes your idea the first time you explain it, your idea isn’t risky enough.”
Step 3: Plan
For many teams, selecting a promising solution is the hardest step. Revisit the list of needs, constraints and research from the earlier steps, compare your best ideas, select one solution and make a Plan to move forward with it.
Step 4: Preliminary Design Sketch
Once you have selected a design, you will need to create a virtual representation of your idea in Tinkercad. Your design must be drawn to scale. You will need to create a free account on Tinkercad.
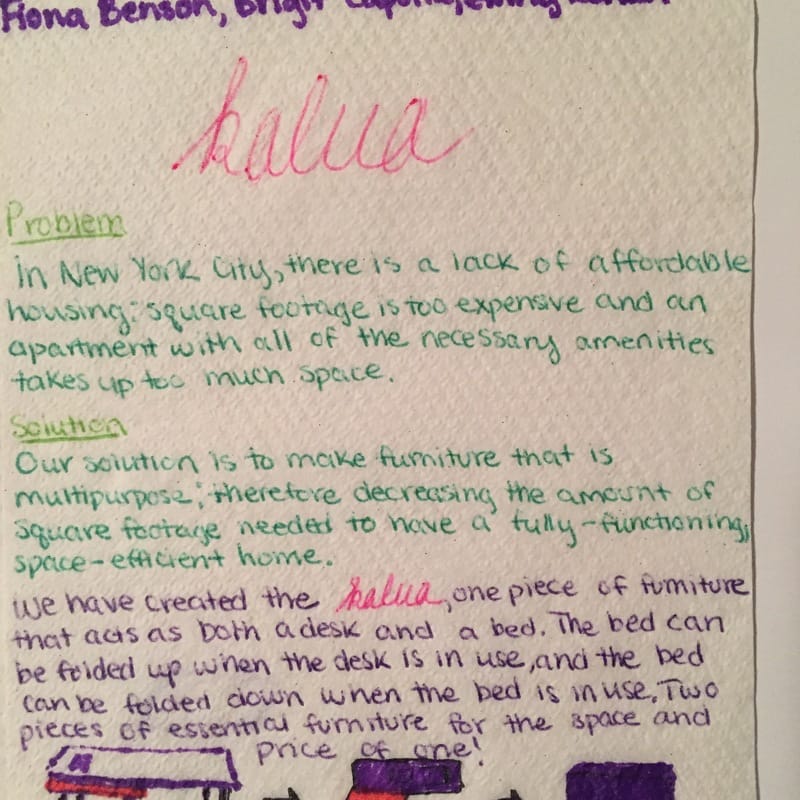
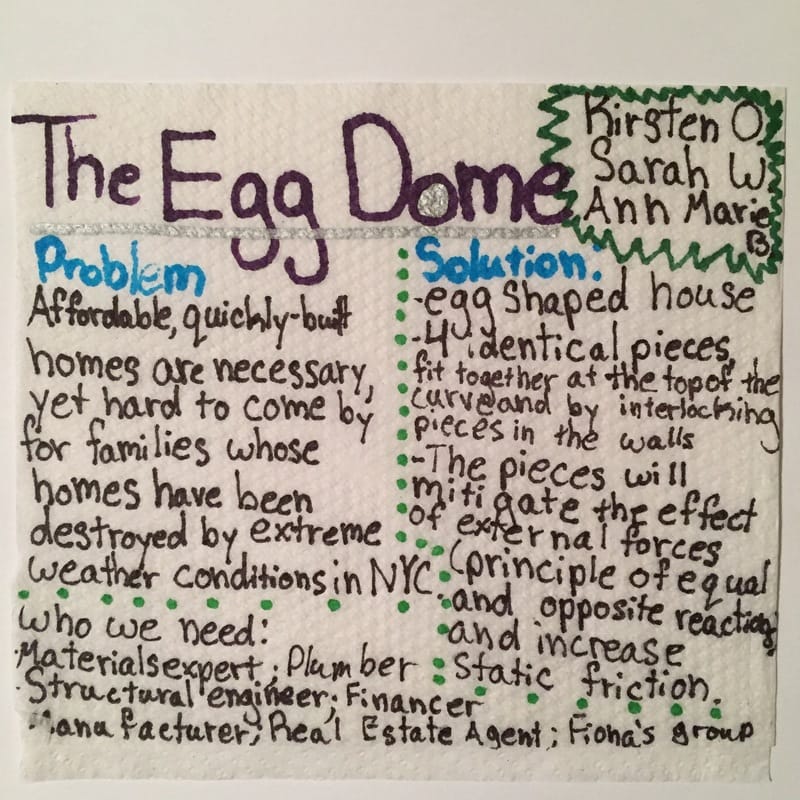
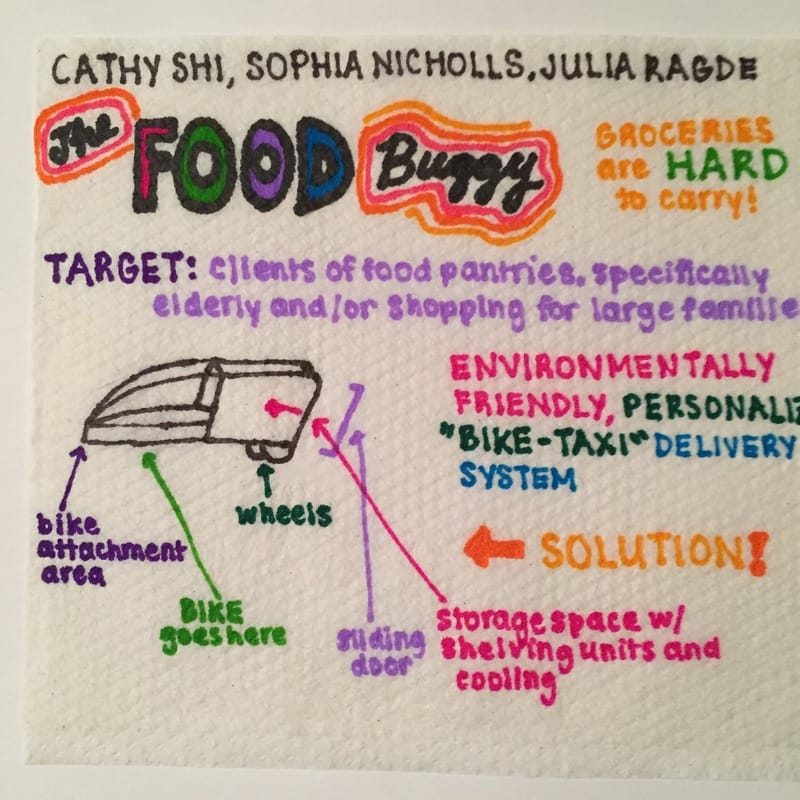
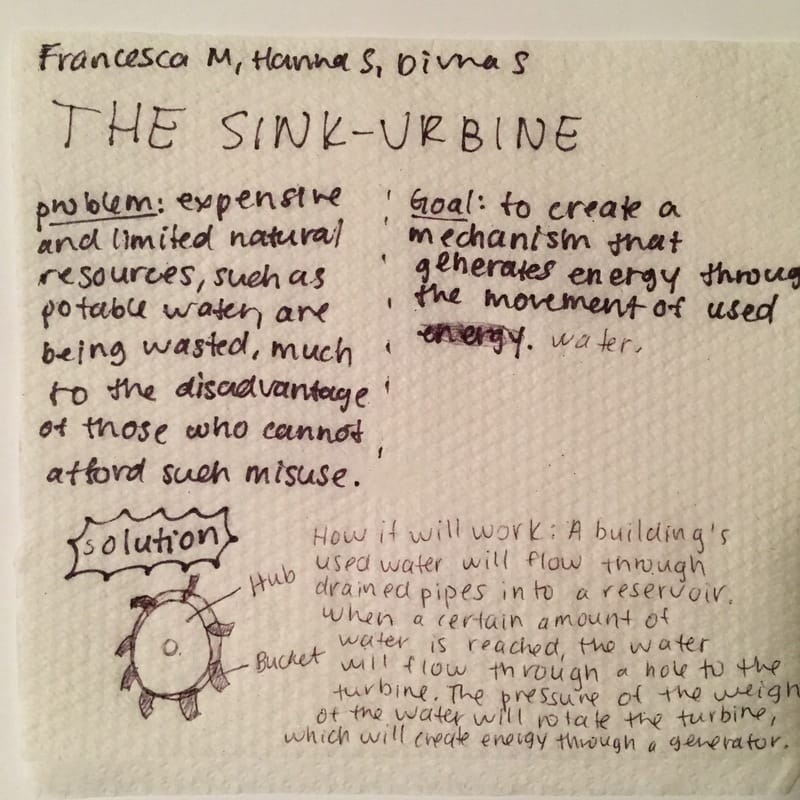
Step 5: Create Some Napkin Pitches
The napkin pitch provides a simple, consistent format for summarizing and The napkin pitch provides a simple, consistent format for summarizing and communicating new concepts. The name derives from the notion that a good idea can (and should) be communicated simply – so simply that it would fit on the back on a napkin.
For a given concept, the napkin pitch describes the target stakeholders, their unmet need, and why your offering creates novel value for them; the elements you will make, buy, and partner for; the channels you will use; and the potential rivals or other factors to watch.
Then, on an actual napkin, write your pitch using the template shown in the image below.
Step 1: Ask
As you identify your growth opportunity, it is important to consider whether design thinking is a fit for solving it. Design thinking is an approach to solving problems especially suited to conditions of high uncertainty. Your project should focus on a design thinking solution.
Write down an area of opportunity you think you might like to explore. Research local issues related to your topic. Ask friends, families and experts in the field about problems that need solving.
Create a professional Twitter account with your school email. Find appropriate organizations, knowledgeable people and advocates to follow as a source of current information.
Information about documenting your project will be provided to you as well as how you will justify your use of physics to solve the problem.
Step 2: Imagine A Solution
This is where you develop possible solutions by brainstorming ideas. You’ll work with your team to develop as many solutions as possible. This is the time to encourage wild ideas and defer judgment. Build on the ideas of others. Stay focused on topic and have one conversation at a time. Remember, good design is all about teamwork.
You may wish to use post-it notes as a means to document all of your ideas. Be sure to take photos of your post-it notes.
Due Date: Friday, November 18
Feedback Alert: Your peers will give you feedback on your design.
Remember: “If someone likes your idea the first time you explain it, your idea isn’t risky enough.”
Step 3: Plan
For many teams, selecting a promising solution is the hardest step. Revisit the list of needs, constraints and research from the earlier steps, compare your best ideas, select one solution and make a Plan to move forward with it.
Step 4: Preliminary Design Sketch
Once you have selected a design, you will need to create a virtual representation of your idea in Tinkercad. Your design must be drawn to scale. You will need to create a free account on Tinkercad.
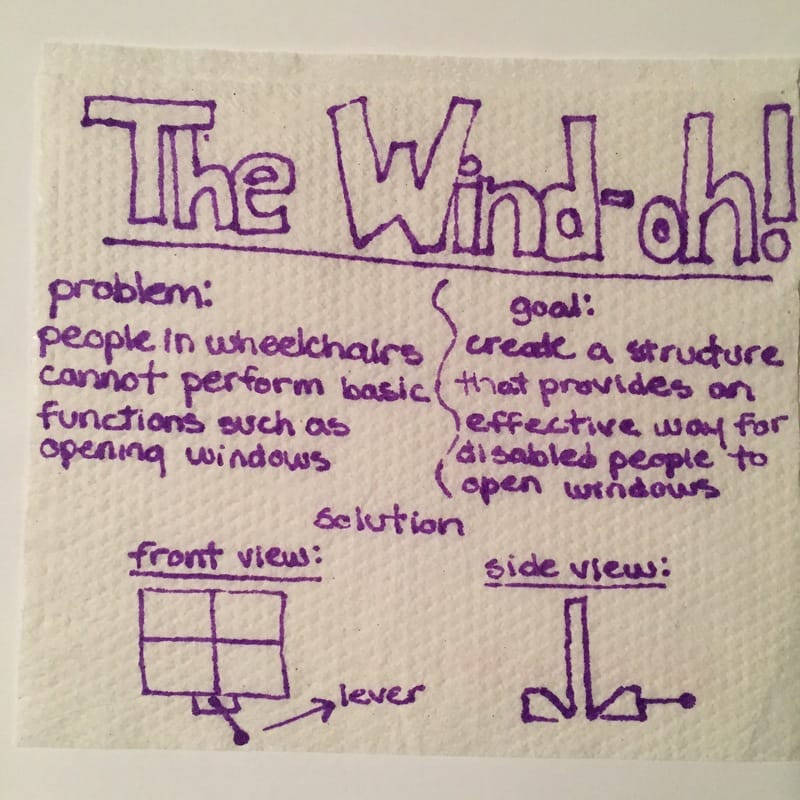
Step 5: Create Some Napkin Pitches
The napkin pitch provides a simple, consistent format for summarizing and The napkin pitch provides a simple, consistent format for summarizing and communicating new concepts. The name derives from the notion that a good idea can (and should) be communicated simply – so simply that it would fit on the back on a napkin.
For a given concept, the napkin pitch describes the target stakeholders, their unmet need, and why your offering creates novel value for them; the elements you will make, buy, and partner for; the channels you will use; and the potential rivals or other factors to watch.
Then, on an actual napkin, write your pitch using the template shown in the image below.
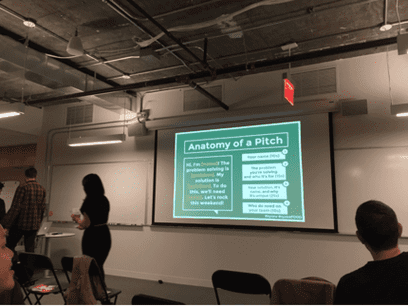
In case you can’t read it, “Hi, I’m [state your name] ! The problem I’m solving is [problem]. My solution is [solution]. To do this, we’ll need [team].
Or:
Your name (10 sec).
The problem you’re solving and who it is for (15 sec)
Your solution, it’s name and why it’s unique (25 sec)
Who do you need on your team (10 sec).
Finally, record your napkin pitch on your phone and upload your video to Dropbox.
These steps need to be completed by December 16.
Feedback Alert: Mr. Walters will give you feedback at this stage.
Step 6: Build a Prototype
Rapid prototyping is the creation of visual (and sometimes experiential) manifestations of concepts. It is an iterative set of activities, done quickly, aimed at transforming the concepts generated in the What if stage into feasible, testable models.
The first role of a prototype is to help you figure out what to build. Only later, after users have interacted with many iterations of the “what to build” prototype, will you create refined prototypes that help you figure out how to build it.
For this step, you may use any of the equipment listed below to construct your prototype. You are responsible for making arrangements with Ms. Godwin to master the tools in the Idea Lab. At the end, you should have “finished product.”
These steps need to be completed by the end of January.
Step 7: Get Feedback
Stakeholder or customer co-creation is the process of engaging potential stakeholders and customers in the development of new concepts. It involves putting some rough prototypes in front of them, observing their reactions, and using the results to iterate your way to an improved concept.
You will present your designs to a panel of design judges in early February.
Part 3: Equipment
You have a wide range of equipment available to you for this project
a. Replicator 2: Your 3D Printer
b. Arduino: Arduino is an open-source electronics prototyping platform based on flexible, easy-to-use hardware and software.
c. Epilog Laser Cutter
d. MakeDo cardboard construction kit
Your design solution could include:
Something 3D printed/Arduino or other sensor to record information and then do something/Something laser cut/Cardboard construction.
Project Documents
| Project Guidelines |
| Project Checklist |